
Introduction
It may surprise some Swallow Boats sailors to know that there are, as of November 2012, three junk rigged Swallow Boats ‘on the water’. The first was my Storm Petrel Cadenza, built in 2004 with SB sprit gunter rig, and converted to junk rig (JR) in 2009, mainly in pursuit of quick reefing capability in a small tippy dinghy. The second is my Trouper 12 Cavatina, completed in September 2012 and rigged from the outset with JR: most of this article is a description of her rig which promises to be exceptionally effective. The third is Gigi, also completed in summer 2012. She is a BC20 owned and sailed by Robin Blain who, through his firm Sunbird Marine, has been junk rigging yachts since the 1980s and probably knows more about the practicalities of JR than anyone else.
This article is an edited version of the information about junk rig which I contributed to the topic ‘Information about junk rig’ (mainly about my early experience with Cavatina) in the ‘Technical’ section of the forum in Oct/Nov 2012. It should perhaps be pointed out that ‘western’ applications of junk rig have, to date, been almost entirely confined to yachts (keelboats). The use of JR in smaller craft under about 20 ft is, relatively speaking, pioneering stuff.
Sources of background information
‘Practical Junk Rig’ (PJR) by Hasler and McCleod. This is the classic text on JR, and incidentally one of the best written books of its kind that I know. Copious illustrations, cross-referencing in the text and a very comprehensive index make it easy to use as a dip-in reference book. It is, however, becoming dated, and relatively recent and significant advances in, for example, sail design have happened since even the latest edition which had a small ‘updating’ appendix. I believe the Junk Rig Association (JRA) are planning a new multi-author book.
‘A Hand Book Guide to the Rigging and Sailing of the Junk Rig’ (RSJR). This very useful guide, produced by and available from Sunbird Marine, has many useful sketches and diagrams.
Junk Rig Association website. The website is partly members only, but there is some really useful stuff in ‘the public domain’ (to use their rather quaint language). On the home page there is a menu-thingy on the left: a click on ‘Junk Info’ brings up ‘Public Domain info by’ and two names, Arne Kverneland and Slieve McGalliard. Both are well worth reading. Herewith a recommended shortlist of the contributions of each –
Arne Kvereneland. He is Norwegian, and a pioneer of cambered panel sails, which he makes himself. Arne’s sails are bright royal blue , and there are now about six JR yachts with blue sails in Norwegian waters: the JRA has a Norwegian rally every now and again around these boats. Of his online writings, I recommend –
– ‘Junk rig for beginners’ – excellent starter.
– ‘Variations of the Pilmer sheeting’ – I refer to this later.
– ‘Peaking up the junk sail’. Arne admits he has been very slow to realise its importance in terms of getting a cambered panel sail to set properly without ‘stress’ in the rig, manifest as diagonal creases across the panels.
Slieve McGalliard. His yacht, ‘Poppy’, probably has the most powerful ‘western’ JR yet devised. Slieve seems to be in the process of writing a book (or contributing to the new JRA book?), and his ‘public domain’ writing appears to be drafts of bits of this, in which case ‘C and SJ’ presumably stands for ‘Cambered Panel and Split Junk Rig’. For starters, try –
– ‘C and SJ p1 – 22’
– ‘C and SJ Chap 11 rigging’
– ‘Copy of article from AYRS Catalyst no 37’. Among other things, this gives an account of how Poppy startled Cowes by her performance in the Round-the-Island Race in 2008.
Cavatina’s junk rig
I have taken some pictures of the rig: these are described here. (Please ignore the dates on the photos, with my apologies for forgetting to set the date facility on the camera.)
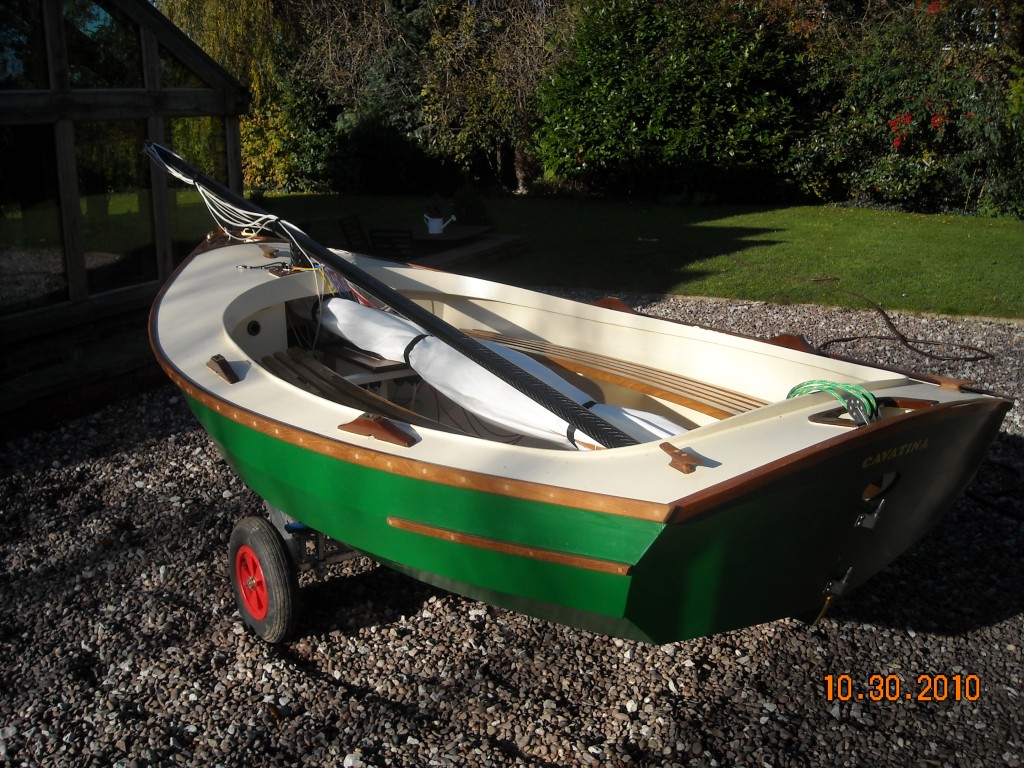
Photo 1
The sail bundle (that’s the boom, yard, all five battens and the sail) fits snugly and neatly within the cockpit, for ‘parking’ and towing. The CF mast, which is 3 ft longer than the hull, rests on a short length of CF tube about 10 mm greater in diam than the mast (this has another function which I’ll come back to). For towing (ie when the trolley is on the road base, not in picture), there is a taller mast support on the road base so that the masthead doesn’t foul the back of the tow car.
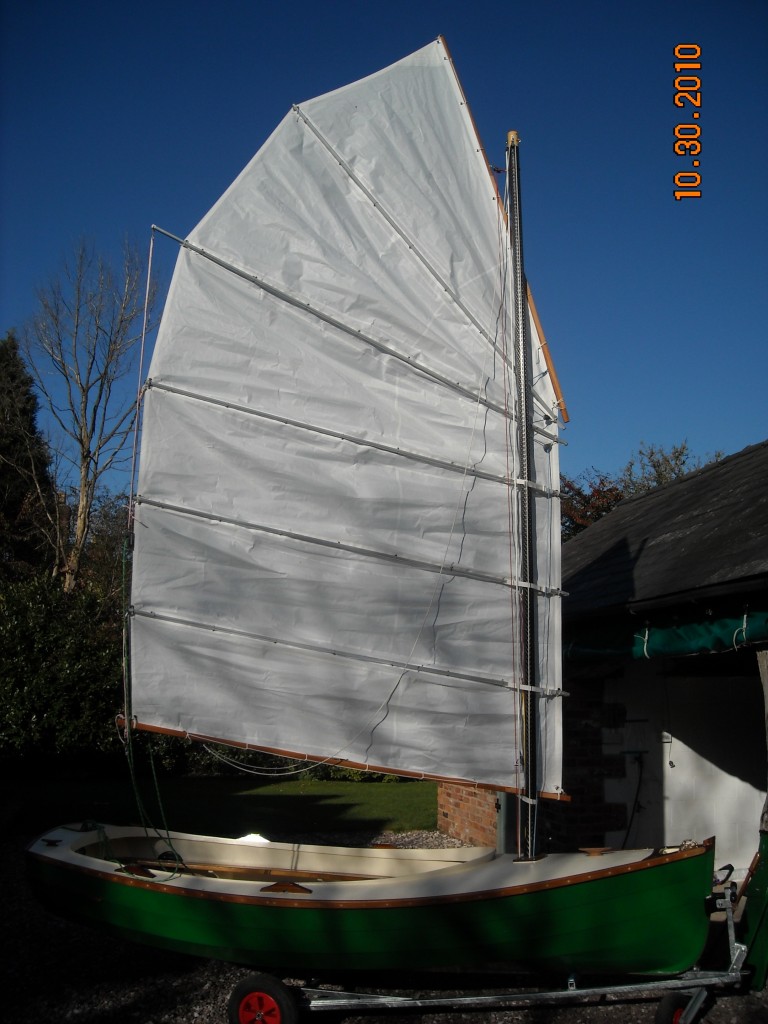
Photo 2
This gives a general view: the mast and height of the sail is a bit foreshortened by the camera angle. The mast is unstayed. The yard is slung from its mid-point. Not apparent from this picture is that 1) the halyard is two-part – not strictly necessary for this size of sail, but it makes it possible to hoist easily with one hand while ensuring the hoist goes up smoothly (eg no lines snagging) with the other: 2) the yard hauling parrel is attached to the yard about 12 ins above the sling point ( see Photo 4, below).
The topping lift is double, ie down each side of the sail, running freely under the boom. It starts at the mast head on the port side, passes down and under
the boom, up to the mast head on the starboard side, through a small block and down to the deck at the mast foot. All the battens except the top one are sheeted: that way the shape of the leach is under complete control (see Photo 8, below). The 4th batten is longer than the others so that the upper sheet spans don’t foul the leach when tacking or gybing.
Note the Rogers ‘patent’ batten parrels keeping the bottom three battens close to the mast. (I would register them except that I’ve had to accept that the potential market for batten parrels for junk rigged dinghies is not big enough for the enterprise to be commercially viable.)
It is inevitable that a JR sail with cambered panels looks a bit ‘untidy’ when there is no wind filling the sail, because of the built-in camber in each panel. Filled with wind, it becomes curvaceous and graceful.
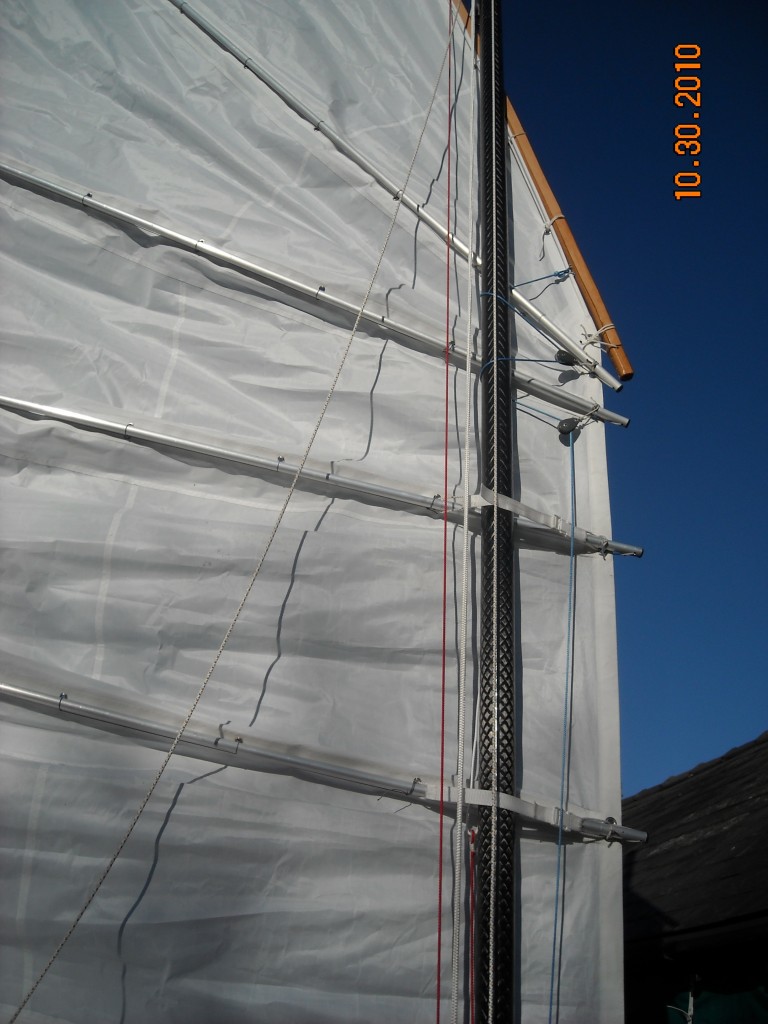
Photo 3
The red line top to bottom is the yard hauling parrel (YHP). The blue line starting on the yard, looping twice round the mast and through blocks and then passing to the mast foot, is the luff hauling parrel (LHP): this has two important functions. 1) Its attachment to the yard tends to pull the throat end of the yard down, complementing the peaking up action of the yard hauling parrel (see Photo 2 and above). Adjustment of these two lines ensures that the yard remains at its optimal angle, which eliminates diagonal creases in the sail panels (see Arne Kverneland’s paper on ‘Peaking up the junk sail’). 2) The LHP also acts as batten parrels for the top two battens. Robin Blain and Chris Scanes introduced the attachment of the YHP well above the sling point (see Photo 2 and above), which was an innovation (the traditional attachment is at the sling point, ie exactly half way along the yard). With Chris Scanes’ sails, in my experience at least, this results in perfect setting.
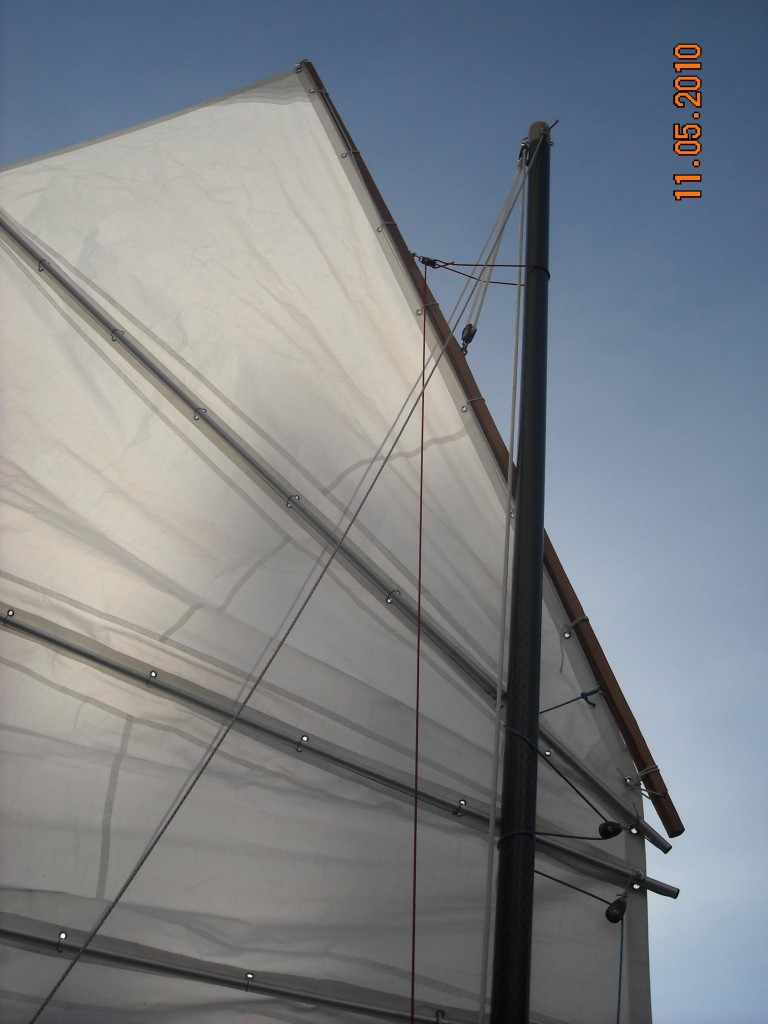
Photo 4
The sail is NOT fully hoisted. Although it doesn’t look like it, the sling point for the yard is exactly half way along the yard. The YHP starts from the becket (or equivalent) on a smallish block attached to the yard about 12 ins above the sling point, passes round the mast (and all three components of the halyard), back through the block on the yard and down to the deck. Hauling it does two things – 2) it pulls the yard into the mast and keeps it there; 2) because of its point of action on the yard, it pulls the top of the sail upwards and forwards (‘peaking up’).
The LHP starts near the lower (throat) end of the yard, and passes twice round the mast and through small blocks near the luff ends of the upper two battens before going down to the deck. Hauling it does three things – 1) it pulls the lower end of the yard down, complementing the ‘peaking up’ action of the YHP; 2) it pulls the luff of the sail aft; 3) it acts as batten parrels for the top two battens, keeping them close to the mast.
The LHP could be wound right down the mast, providing a parrel function for all the battens. Some bigger JRs do this and, because of the increased friction involved, the LHP is then often divided into upper and lower sections which pass separately down to the deck. However, at least on my small rig, if the ‘peaking up’ is properly organised by balance between the YHP and LHP, the sail hangs from the yard in such a way that there are no diagonal creases in the sail panels (a sign of ‘stress’), and I can flaunt my adjustable batten parrels (see Photo 3), which only have to keep the luff ends of the lower three battens against the mast.
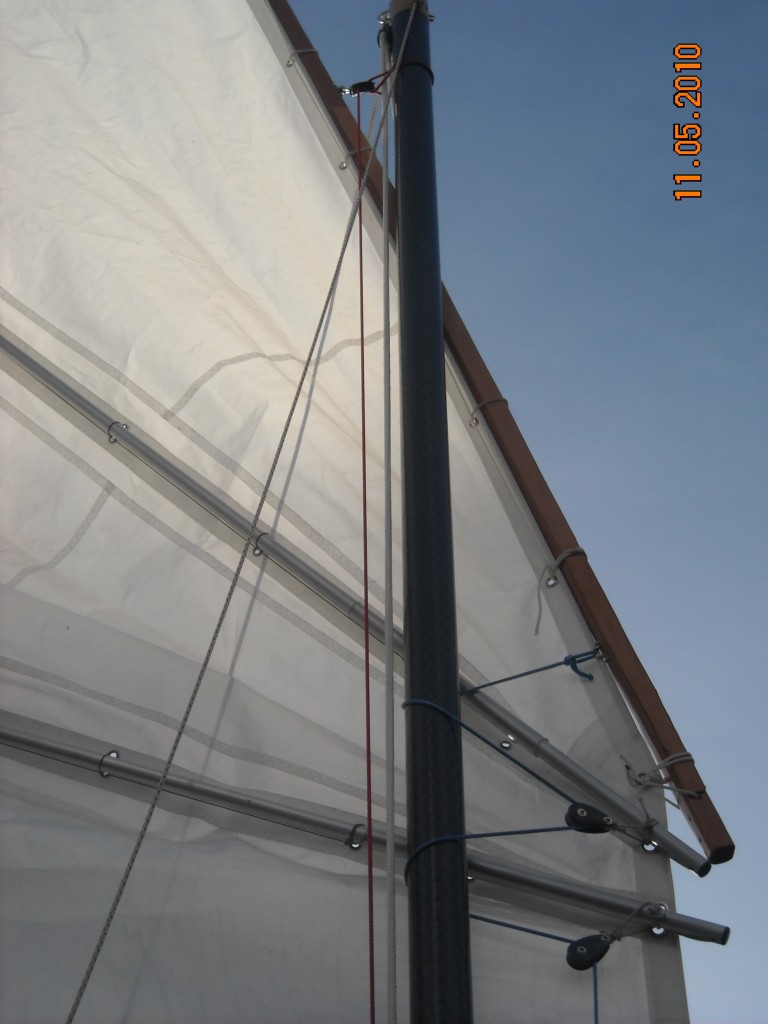
Photo 5
Here the sail IS fully hoisted. Neither the YHP nor the LHP is under much tension, an illustration of the unstressed nature of JR as a whole. There are, of course, no shrouds or stays, and only the halyard and the sheet are worked at all hard. Even the boat is relaxed!

Photo 6
The running lines are led from the mast foot to camcleats under the dagger board support beam, where they are to hand, eg for reefing. (Incidentally, one of the many plus features of the Trouper is how far forward the dagger board is, leaving a wondrously uncluttered cockpit). Photo 6 also shows the CF collar at the partners, through which the mast is stepped and unstepped. This is shaped to act as a mast support when the boat is unrigged on its launching trolley, but it has an even more important second function. When the sail is dropped, the loops of the YHP and LHP round the mast drop round this collar, and remain there when the mast is unstepped. Next time the mast is stepped through the collar, those loops slide up again round the mast as the sail is hoisted.
I reckon that rigging my boat is not much more complicated or time-consuming than rigging a boat with gunter or bermudan rig (I have to hand it to lug rig in terms of simplicity).
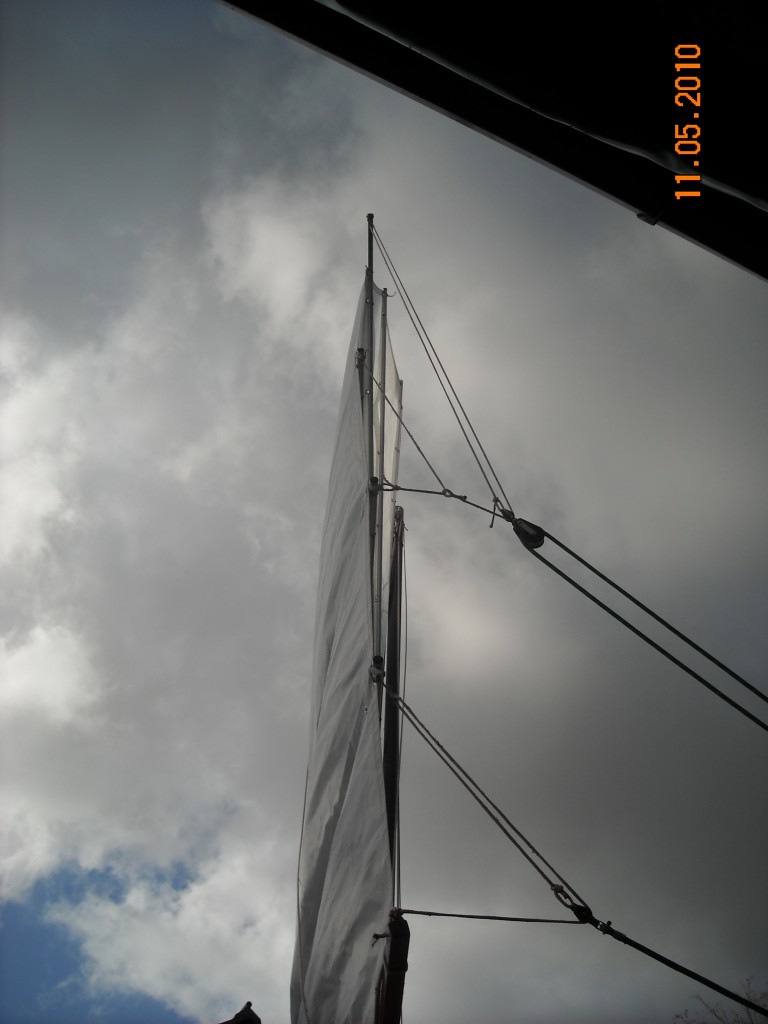
Photo 7
Sheeting arrangements for JR are much debated and potentially quite complicated (see PJR and RSJR). Control by one sheet of the boom and all but one of the battens (usually) is required, in such a way that the sail maintains an overall shape which enhances its performance, and avoids ‘twist’ – a term used by JRers to indicate that one or more of the batten ends is out of line with the rest, spoiling a smoothly curved leech.
In my JR for Cadenza, I took advice and have a system which works quite well, but involves three sheet spans (these are the thinner lines which link two or more batten ends – see below), a triple stand-up block on the stern and the odd nautical mile of expensive 8 mm line for the sheet. For Cavatina, having researched further, I followed Arne Kverneland’s advice as described in his paper ‘Variations of the Pilmer Sheeting’ (see JRA website: Pilmer, by the way, is a ‘classic’ JR yacht described in PJR). I have a two-sheet-span arrangement: the upper span, as shown in Fig 2 of Arne’s paper, controls three battens, and the lower span, shown in Fig 3, controls the bottom batten and the boom. (The top batten is left unsheeted.)This system uses quite a bit less ‘large string’ than three-spans-plus-a-triple-block and (bearing in mind that I have so far only been able to sail Cavatina three times) seems to work exceptionally well, as illustrated in Photo 8. This is an edge-on view of the leech of Cavatina’s sail with some wind trying to fill the sail, and it does give some idea of how the spans are organised. Note, above all, the untwisted shape of the leech: even the unsheeted top batten, which is just visible, falls into line – literally. The clever bit is that this degree of control of the sail, right up to the top of the leech, applies on all points of sailing.
There is a small block with becket on the lower span, and a small block bolted to a large one (making a rather unequal sister-block) on the upper span: all other ‘sheaves’ are s/s thimbles. The spans themselves are 3 mm dyneema (strong and slippery.). The upper- most sheeted batten is extended beyond the leech so that the top span does not get caught on the lower batten-ends when tacking and – especially – gybing. This works.
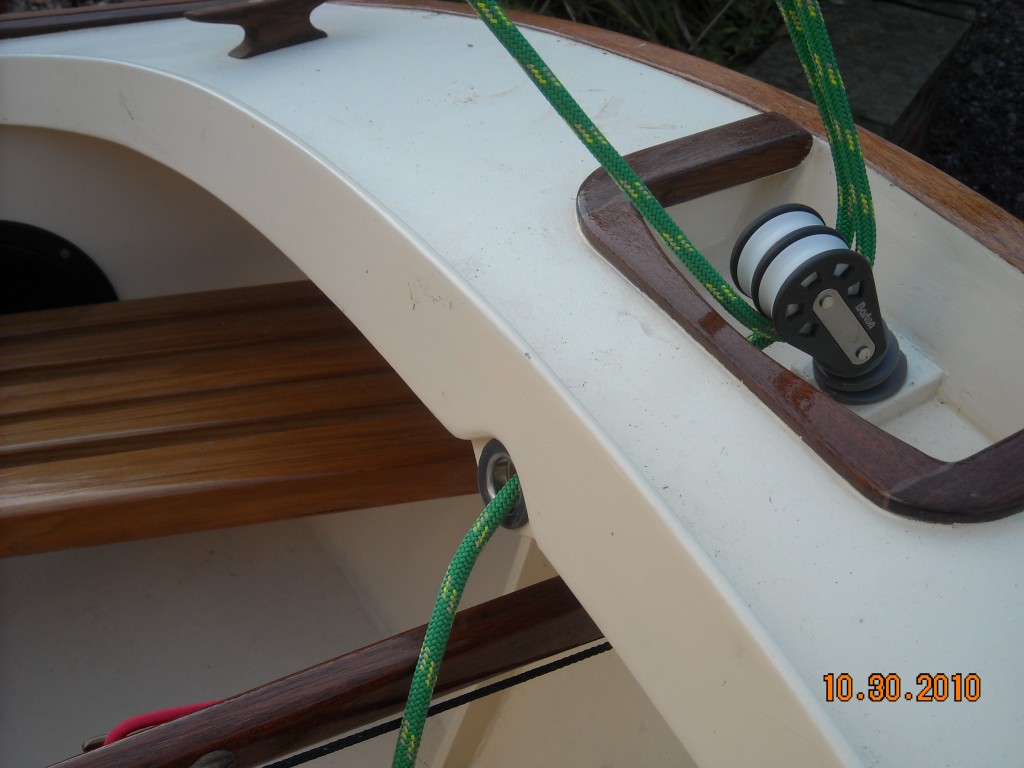
Photo 8
The sheet itself (colour co-ordinated only because the green stuff happened to be on special offer) starts with a thimble in the end shackled to the lower sheet span block; it passes down through the double block in the shallow well in the after deck, from there up to the upper sheet span block, and back down and through the second sheave of the double block. The well is open forwards below deck level, enabling the free end of the sheet to pass forward through a large bush in the lower edge of the coaming, emerging into the cockpit just above the tiller (which, in the Trouper, is shipped through a tiller port in the transom). This arrangement proves to be as handy as I had hoped.
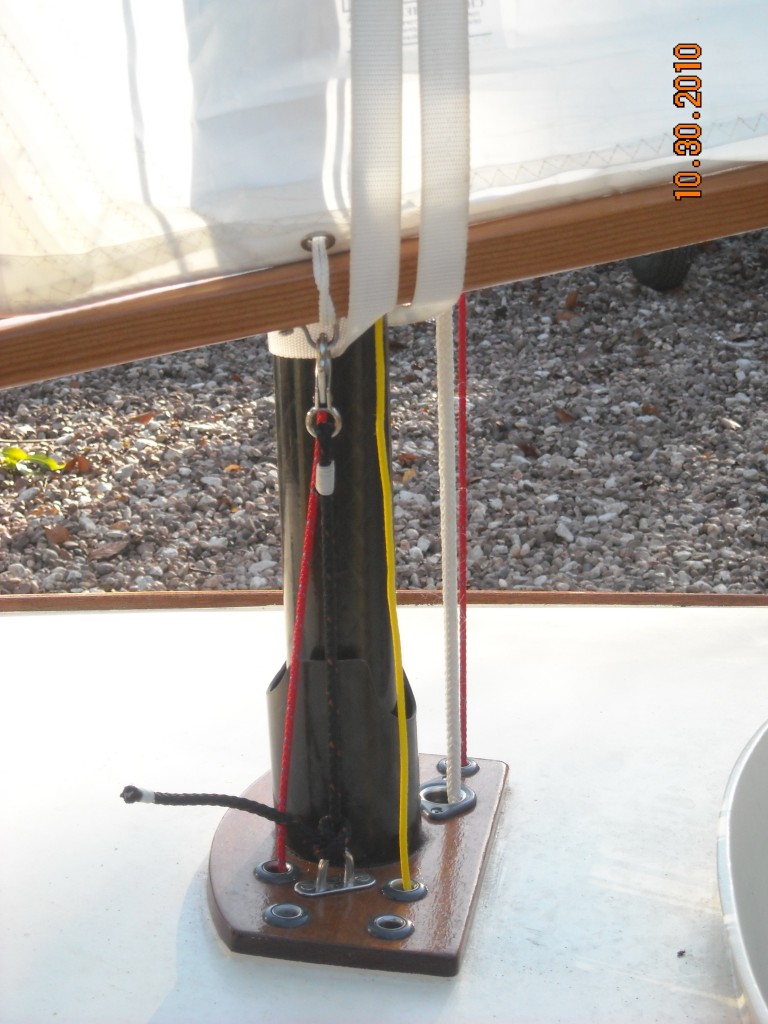
Photo 9
This shows the port side of the foot of the mast – the opposite side to all the other pics because almost all the running lines are on the starboard side of the sail. The tack line is just visible, black against the black CF mast; it holds the boom down so that the luff can be tensioned by the upward pull of the halyard. The yellow line is the bottom batten downhaul, the red line downhauls for both the second and third battens: these only come into play when reefing. The thicker white rope is the halyard, the red one beyond it is the yard hauling parrel.
The white webbing is the very bottom of the boom lift, which isn’t well illustrated and which I’ll try to describe. A line comes down from the masthead on the port side of the sail to about the level of the bottom batten; it has a carbine clip on its end. There is an approx 3 ft length of webbing with a D ring sewn securely onto each end. One ring is clipped onto the descending line; the webbing is passed round the mast below the boom as shown, and back up to the carbine clip which secures the other D ring. There is thus a loop of webbing suspended from the masthead on the port side, passing round the mast below the sail: the whole lift is adjusted to be slightly slack so that it doesn’t interfere with the curve of the sail when on the starboard tack. Its function under full sail is to act as a boom parrel, keeping the boom close enough to the mast.
It is also essential for reefing. During reefing, when one, two or three battens can be dropped, the tack end of the sail bundle (= boom, battens, and reefed sail panels) is caught up between the boom lift and the mast: otherwise it would sag to the deck. (The clew end of the sail bundle is caught by the topping lifts: in a larger rig than mine, more elaborate lazy jacks might be needed to achieve this.) At the tack end of the bundle, down-pull is provided by the batten downhauls, against which the halyard can be used to tauten the luff.
Michael Rogers